Tutorial: Part 4 of How To Photoshop Historical Sewing Patterns so they Fit You - Merge Your Sloper with a Sewing Pattern


Today using Photoshop I'll show you how to combine your personal Sloper, as prepped in Part 2, with a digitized Historical sewing pattern of choice, from Part 3, into a newly drafted pattern that's custom fitted to you.

In this example I'm using the bodice from "Women's Costume" pages 18 to 20 of the National Garment Cutter (circa 1888) which I have downloaded as a PDF from the Internet Archive.

You'll find it easier if you come to this tutorial with a working knowledge of using these Photoshop Tools: Free Transform Tool. Other than being able to sew, I don't think you'll need any pattern drafting experience, (I don't, and this method has worked for me!)

First open in Photoshop the life-sized Front and Back Slopers, as prepped in Part 2.


I'm going to combine them into one document. Choose either file, I selected my BACK Sloper doc,
then go IMAGE > CANVAS SIZE as pictured below, (click to see larger image)


In the options box, double the width of the canvas, set the anchor points to enlarge the canvas to the right, and set background to white:


Now my BACK Sloper file looks like this: (click to see larger image)


Open the FRONT Sloper PSD file, copy the layer that has the Front sloper image by SELECT > ALL then EDIT > COPY, return to the BACK Sloper doc and EDIT > PASTE

It will look something like this: (click to see larger image)


To align the front and back slopers side-by-side, select the MOVE tool from the Tools, circled in red below, and then left-click and drag the front sloper layer (layer 2 in my picture) so the lowest point of the arm holes line up, like this: (click to see larger image)


Don't worry if the bottom of your front sloper layer appears to be cut off, as mine is, to fix this simple go IMAGE > REVEAL ALL as pictured below. (click to see larger image)


(Reveal All does increase the canvas size, but the images are not changed, they are still 1:1 life-sized as you first set them up in Part 2.)

Now if you have a bit of space between the two slopers, as I do, you need to get rid of it by masking off the background behind the sloper, which in my case is the green cutting mat.

I do this by MASKING. If you've never tried this before, it's very easy don't worry. Here's how:

From the Tools, select the POLYGONAL LASSO TOOL, circled in red below,
Then with the top sloper layer active, in my case the front sloper layer 2, use your mouse to 'lasso' around the background you want masked out.
Note: I have turned off my Layer 1 so you can see my selection.

[How to use the lasso tool: each corner point is created by left-clicking, each line is created by dragging, and the selection is closed and activated by returning to the start point and left-clicking.]


With the portion of the background you want to mask as a selection, left-click the Add Layer Mask icon which is third from the left at the base of the Layers Palette, green circle below: (click to see larger image)


Don't worry if your picture freaks out and everything disappears, as pictured below: (click to see larger image)


Simply hit "CONTROL i" on the keyboard, and this will invert the mask to the correct way round, as pictured below:


You can now move the layer into better position, by selecting the MOVE Tool again and dragging the top layer as close as possible, like this: (click to see larger image)


It's entirely optional, but if you wanted you could mask out all of the backgrounds ( we only needed the background when enlarging the slopers to life-sized as in Part 2)

Now SAVE your combined slopers as a new PSD file, I called mine "Sloper - Bodice - Front & Back"

We're going to leave this file for a moment a switch over to the cleaned up Historical Sewing Pattern file created in Part 3.

Open it in Photoshop, it should look something like this: (click to see larger image)


Note: I'm ignoring the sleeves, for demonstration purposes only .

Now using the individual Bodice Custom Shapes also created in Part 3, using whatever colour you want to outline, drag out a 'shape' over it's corresponding pattern piece so they match exactly - we're doing this to ensure everything starts out in the correct proportions for the next step.

Troubleshooting Note: If you have issues manipulating the size and placement of the custom shape, drag it out to about the needed size, then use the Free Transform mode to tweak it the size and position - don't forget you MUST hold down SHIFT to keep the proportions correct.

When you're done it should look something like the picture below, (click to see larger image) , each pattern piece will have it's own Shape Layer.


In the Layers Palette, under the Shape Layers, create a New Layer and fill it with white, (I'm not step by stepping this, do I need to??) so now you can only see the Shape Layers


The next step is to shuffle the shapes around and line them up so the arm hole becomes clearly defined.

Do this by selecting the individual Shape Layers, and use the Free Transform Tool, EDIT > FREE TRANSFORM, or CTRL T, to move, rotate and flip the Shapes as needed.
But DO NOT mess with the proportions at this stage.

You can bring up additional options for the Free Transform Tool by right-clicking whenever see you can see the 'frame' box, as pictured below. (click to see larger image)


I can't step by step this, as each sewing pattern will have its own quirks, for example in the pattern I used, I had to flip the Back piece around, but pictured below, this is what you're aiming for. The pieces have been properly aligned so the arm hole becomes clearly defined.


And I've used a different colour for each piece, just to demonstrate how the seam allowances need to overlap.

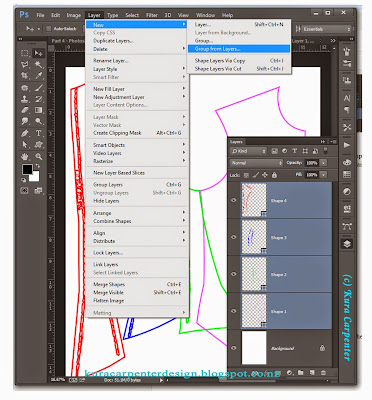
Now in the Layers Palette, SHIFT CLICK and hold, on each SHAPE Layer to select them all, and go LAYER > NEW > GROUP FROM LAYERS as pictured below: (click to see larger image)


An options box will pop-up. Give the Group a suitable name, as below:


With the new group you created selected, go LAYER > DUPLICATE GROUP (sorry, couldn't get a screen shot) an options box will pop-up, you want to change the destination to your personal Sloper file, as pictured: (click to see larger image)


Now when you switch back to your Sloper file, your Custom Shape pattern pieces will also be there in its own group, as below: (click to see larger image)


Don't worry that it's tiny, because we learned in Part 3, the Custom Shapes are infinitely scalable and won't loose definition.

Use the Free Transform Tool on the group to scale it up to match the Sloper armhole with the Pattern pieces armhole, as best you can, but don't expect it to be perfect.


Hopefully with lining up the armholes on both Sloper and the Historical Pattern pieces you can begin to see how this merges into a final pattern, as pictured above. The historical pattern creates the "style" and the Sloper provides the necessary dimensions so it will fit you.

Now simply use the Free Transfor Tool (Control T) to manipulate the historical pattern pieces so they match up to your personal Sloper. You don't need to hold Shift anymore, just pay attention to the key areas: waistline, width and armholes, which are determinded by your Sloper.

I'm pretty happy with the way this is looking (pictured above), the armholes align and waist looks perfect at the back. While the shoulder seams are different, they're in proportion and I'm aware shoulder seams in older garments don't sit exactly on top of the shoulder they they do in modern garments.


When happy, turn off the Sloper layer and print out the historical pattern shape layers. Print them as individual layers / pattern pieces so they don't overlap each other. They'll probabably print bigger than your home printer can output and require sellotaping together but this is no biggie.

Note: you will need to hand-draw an added a seam allowance, I like to add big allowances of 1 inch / 2.5cm. See the Back Pattern piece Pictured below: (click to see larger image) Remember to add the seam allowance before you cut out the pattern pieces!

Lay out the newly printed pattern pieces on a suitable material and start cutting out your first mock-up. Be prepared to be amazed. It should fit you!!!

In this example I'm using the bodice from "Women's Costume" pages 18 to 20 of the National Garment Cutter (circa 1888) which I have downloaded as a PDF from the Internet Archive.

Any questions, just let me know, and your comments are always welcome. Have fun! Good luck!

Here's a few construction photos of when I made up this bodice:


Back panels of bodice from "Women's Costume" from the National Garment Cutter (circa 1888)

Front and Back Back bodice from "Women's Costume" from the National Garment Cutter (circa 1888)

Showing flatlined interior of bodice from "Women's Costume" from the National Garment Cutter (circa 1888)Finished garment, "Women's Costume" from the National Garment Cutter (circa 1888)


Tutorial: How to Digitize Sewing Patterns in Photoshop - Part 3 of Drafting Historical Sewing Patterns in Photoshop so they Fit You


Today I'll be showing How To take a vintage or Historical Sewing Pattern and Digitize it in  Photoshop so you can scale it to any size you want - and if you follow along my other tutorial posts, Part 1, and Part 2, the ultimate goal being a sewing pattern drafted to fit you, that final step will be covered in Part 4.

So we need a copyright free sewing pattern and in this example I'm using the bodice from "Women's Costume" pages 18 to 20 of the National Garment Cutter (circa 1888) which I have downloaded as a PDF from the Internet Archive.

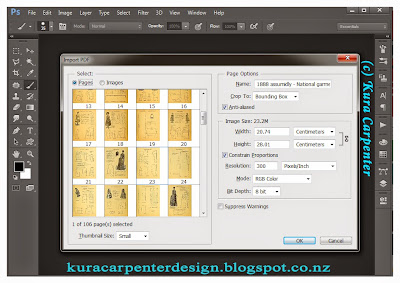
After starting up Photoshop go to File > Open and select the PDF.

An options box as pictured below  (click to see larger image) will open. Choose PAGES and scroll down all the page thumbnails to find the page you need. [Note, don't rely on the numbering, because although the page I want is labelled "19" in the original document it's counted as page 23 by Photoshop.]

Left-click the page you want and a blue box will highlight it (very hard to see in my image, sorry). Ensure the Resolution is 300 pixels per inch. Don't worry about the other settings.
Hit OK.

And it should open to look something like this: (click to see larger image)


This particular sewing pattern is scanned from an actual book, which means the brown colour is faded paper. Since I don't want to waste ink when I print my final pattern I prefer to reduce the image to black on white.

Here's how. Open up the Layers Palette (F7) or Window > Layers, pictured below (click to see larger image)


In the base of the Layers Palette look for the fourth icon from the left - it looks like a partly filled in circle - as indicated by the red arrow above right.

Left-click the forth icon and a pop-up menu appears, pictured below.
From the list choose THRESHOLD by again left-clicking


Don't worry if at this point your image freak-outs and some of the lines disappear, resulting in something like this: (click to see larger image)


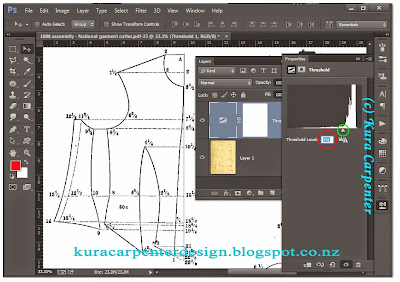
You just need to fine tune the Threshold levels so the pattern lines are properly visible again.

From the Properties Palette, pictured above, you have two choices:

[this palette should have automatically opened when you chose Threshold before, but if it didn't, you'll find it under Window > Properties]

You can either: Left-click and drag the slider icon (circled in green in the picture below, click to see larger image) or enter in another number in the Threshold Level box (red circle).


A Threshold of 191 worked for me, giving a nice crisp black and white image with clean, solid lines, as you can see above.

Note: You can change the Threshold later. This is a adjustment layer and that means you can change it at any stage without altering the original image. You'll see in the Layers Palette the original Page 19, here called Layer 1, is just as brown as before.

Before moving on, let's take a minute to look at the bodice pattern which is fairly typical of it's kind. Generally these patterns could only be enlarged to full size (theoretically your size) by using a Scale Ruler, called an Apportioning scale, specific to the pattern book. Meaning, of course, you had to buy the full system they were selling to make it work. (I could be wrong but I think there's a pattern system that still does this type of thing called Lutterloh.)

The numbers are simply measurement points drafted from the zero point, which in this pattern is marked by "A", and you'll notice the whole thing drafts into a right angle.


And if you had the correct Scale Ruler you could still make up these patterns today.

Even without the the proper ruler you could draft up the pattern just using inches (why inches? cos the National Garment Cutter was an American publication). But unfortunately it's not going to create a pattern which fits you, as I discovered myself.

So that's why I developed this method. Anyway, enough blah blah, let's carry on.

Firstly, all the confusing numbers, well relax, in my method you don't need them, in fact let's cleanup the image and get rid of them.

There are a couple of ways of doing this, 
1) Paintbrush Tool & Magic Wand = The Easy but Slow way, which I recommend if you're new to photoshop.
2) Masks = Quicker but more Advanced, which involves masking out the portions we don't want.
3) Pen Tool = the fastest, most super slick method out there

I'm only going to step-by-step No#1, the Paint Brush Tool & Magic Wand, because I want this lesson to be accessible to everyone, and that means as easy and user friendly as possible. And trust me, at the end of the day, it still gets the job done, and that's what matters.

But if you know how to use Masks already just have a read through to see which parts of the pattern need to be whited-out, do your own thing masking, we'll meet up down the page a bit at the ***

Or, if you're a Pen Tool user, then you probably don't need my help and you can skip heaps of steps. Just create a separate path outlining each pattern piece and scroll down the page until you find the *** where you need to join in again with the lesson.

By the way, if you don't know how to use the Pen Tool, but you've been using Photoshop for a while, then I really suggest you learn, it's what all the smug cool kids use. No, seriously, it will change your sewing pattern drafting life.


1) The Easy but Slow way to Clean-Up the Image:

Create a New Layer (Shift, Ctrl N) or Layer > New > Layer, pictured below: (click to see larger image)


A new Layer 2 will appear in your Layers Palette, as pictured above. (click to see larger image)

From the Tools Palette, find the Brush Tool (indicated by the green arrow, pictured below) and left-click to select it. (Or just hit the "B" key on your keyboard)


You want to 'paint' with white so you'll need to make sure your Foreground Colour is set to white. My foreground was set to yellow, and my background to white, as indicated by the squares at the base of the Tools Palette (where the orange arrow is pointing in the picture above) 

To swap the foreground and background colour around just hit the "X" key on the keyboard, or left-click the double-headed arrow icon that is next to the foreground and background squares, pictured below.


If neither of your squares is white, to return to the Default foreground and background colours of Black and White, hit the "D" key on your keyboard, or left-click the mini squares to the left, pictured below.


Right so, with the Brush Tool selected, and the Foreground colour set to white, your mouse cursor becomes a fine black line when hovered over your picture,  see the fine circle shown under the double purple arrow below.
The shape of the brush head and size can be altered by left-clicking the Brush Preset Picker, indicated at the top of the double arrow.


Set your brush to match my settings, as below, the only variable is to make the Size what suits you best. Drag the Size slider to increase or decrease the Brush Head as needed.


With Layer 2, (the new blank Layer) active just start clicking over the numbers to white them out. If you make a mistake hit Ctrl Z, or from the menus, Edit > Undo.

Your image will start to look like this: (click to see larger image)


Carry on with all the required pattern pieces. [Note, for this tutorial I'm just showing some of the Bodice pieces and excluding the sleeve completely.] Until you have a nice 'clean' image something like this: (click to see larger image)


Before I clean up the extraneous dotted lines, I like to mark the waistline with a Red line to make it stand out. In these old patterns You're not often told which line it is, so your pattern reading experience is going to come into play.

Note: Marking your waistline is entirely optional, it doesn't effect anything later on, it's just a handy visual reference.

To change your 'paint' from white to Red open the Swatches Palette via Window > Swatches, or see the picture below, then left-click the swatches icon that the longest green arrow points to.
When the swatches palette pops open left-click on a coloured square and your foreground colour changes. Paint in the waistline as pictured.

Note: Mark the waistline with the paintbrush tool outside the pattern pieces,


Now, switch the paint back to white again and paint out the other unnecessary lines within the pattern pieces - don't completely remove any seam allowance if they're marked, which I'm guessing is what the vertical dotted line on the left-hand side of the Bodice Side piece is.

Eventually (I did say this was the slow way) you'll have a completely cleaned-up image like this:


Note how I've whited out the top and bottom of the dotted side-seam allowance line so it won't interfere with the next steps, but I still want to maintain most of the line as a reminder the area to the left is a seam allowance.

Now let's just check our black lines are as good close up, as they appear from a distance.
Using the keyboard shortcut of Ctrl Plus, zoom in real close and look for any gaps.

When I do this I see there's a weird hiccup on my neckline, circled in green below:


 Which is easily fixed by a dab of black paint...


*** After cleaning-up the image, whether you painted as I showed you above, or you masked out the drafting numbers and lines as suggested we're now Ready for the next steps.

Open up the Layers Palette, if it's not already open, and look at the top right, just under the x, for the tiny Layers Options icon, as circled in Red below. Left-click the Layers Options icon and from the drop-down menu, scroll down to Merge Visible - BUT WAIT - don't click it yet.


First, hold down the ALT key (think it's the OPTION key on a Mac) and then while holding down ALT left-click Merge Visible from the menu, or really test your co-ordination and use the keyboard equivalent ALT+SHIFT+CTRL+E

At this point a wee miracle occurs, and new merged Layer appears, but you still get to keep all the other layers, (important if you need to go back and alter things later on) as pictured below.


Phew! Now we're cooking with fire! Get ready cos the real magic is about to happen.

We need to open the Paths Palette, via Window > Paths,
and then from the Tools icons left-click to select the Magic Wand Tool, as circled in red below:


When your cursor changes hover the Magic Wand inside one pattern piece and then left-click. An active dotted line will appear showing you have made a selection. The selection should be contained within the black lines, outlining the shape of the pattern piece, as just visible pictured below. (click to see larger image)


Now while you have one piece of the sewing pattern selected, left-click the fourth icon from the left at the bottom of the Paths Palette, circled in red below. (click to see larger image)


Within the Paths Palette a new 'work path' will appear, as pictured above, and also the dotted line of the selection will change to a something resembling a connect-the-dots drawing. But don't worry, you've just made a 'path'. It's a good thing :)

*** Hey! Pen tool users, time to pay attention

Now go to the menus at the top and choose Edit > Define Custom Shape, pictured below (click to see larger image)


A pop-up box will appear asking you to name the new custom shape, as below, I've just called it Bodice - Front for convienece, but I'd normally be as specific as possible, because it gets confusing when you have more than one Bodice-Front custom shape to choose from later on.
 

Now we've finished with the work path, deselect it by left-click your cursor within the Paths Palette but under the Work Path box.

We're Nearly there! In a minute your hard work comes together, trust me.

Head over to the Tools icons, usually on the left side of your screen, and find the Rectangle Tool, pictured below:


Left-click and HOLD the Rectangle Tool icon until a menu pops-up, then select the CUSTOM SHAPE TOOL, the wobbly star shape at the bottom, as pictured below:


Next you need to load your Custom Shape. Look along the options that appear in the new tool bar, just under your main menus, for the word SHAPE (pictured below) beside which is a box with a down arrow, click the arrow to open a whole array of custom shapes, but scroll down until you find the last one, which will be the Custom Shape you just made, left-click to select it.


Now Match your Custom Shape Tool Bar settings to mine, pictured below: (click to see larger image)


The settings are: Shape, Fill to None, Stroke to (Colour of your choice), Size = 1pt (my recommendation), Line = solid (which is just my preference, choose what you like).

And open the kind of flower-looking icon to the left of the Shape choices, and select DEFINED PROPORTIONS, as pictured below.


Now comes play time. Zoom out a bit so you can see what you're doing,
and left-click the mouse and drag out. 


Do you know what you just did? You've created a Vector. A graphic which is Infinitely Scalable! Vector files can be scaled to any size you want without losing any image quality. Which is just perfect when drafting sewing patterns!

And not only that, while the Shape layer is active, and the Custom Shape Tool selected, you can carry on changing things to suit you, as below: (click to see larger image)


Now save your document as PSD Photoshop File, create Custom Shapes for each pattern piece you need, and we'll meet back here in a week for Part 4, where I'll show you how to combine your Sloper file from Part 2, and your newly digitized Historical Sewing pattern into a printable sewing pattern that will fit you.

:)

Any questions, just let me know, and your comments are always welcome. Please note, Your custom shape patterns pieces can be opened into any document, just access them via the Custom Shape Tools box. Have fun!